
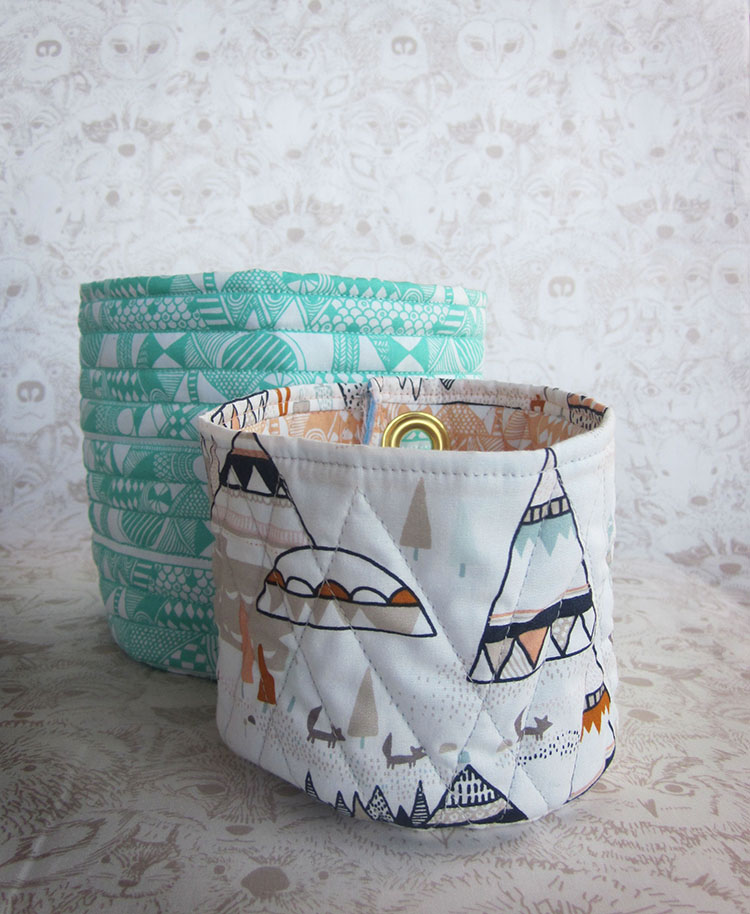
 These are really similar to a lot of thread catchers you'll see out there. I'm just now realizing that. The thread catchers look awesome. You could probably rig up a way to connect this to your desktop and catch thread with it. I use it to hold my current projects. I have one with a few balls of embroidery thread, my needles (to keep them away from the sweet puppy who keeps trying to eat them), one with painted pieces of paper that I'm working on new patterns with, and one with larger projects. Then when I finish those projects I can stack the buckets inside each other. Tadah!
Here's how it goes:
You'll need:
Thread
Scissors
Sewing Machine
a bit of batting or interfacing
a bit of cardboard
hot glue gun
Fabric: this is what I used:
Bucket 1:
Indian Summer IS-60016 Forest Trail Mountain
Indian Summer IS-60016 Drops of Clay
Indian Summer IS-50014 Native Band Jade
Indian Summer IS-60011 Menagerie Onyx
Indian Summer IS-60010 Woodland Oak
Indian Summer IS-60014 Native Band Apricot
How to decide the size!
This is an important step, and I just winged...wung, errr, wingered mine, so you get to decide the size on your own. Mine are about 6" tall. Choose a width you'd like for your circle, say, 6", then go to this amazing circumference calculator, and that will tell you how wide your rectangle of fabric should be! SO if you did choose 6" as your diameter, then your width of your rectangle of fabric would be 18.84. Add in .5" of seam allowance, gives you 18.34. Ta-dah again!
Instructions:
Place the fabrics printed sides facing, with the batting on top, and stitch along the top. Fold over one of the fabrics and top stitch open. I did a wee bit of quilting for funsies. On Native Band Jade, I did just a nice lil straight line quilting. It's a stripe, more or less, so it makes it easy to follow the lines. On the others I just did a checkerboardy kind of thing. Do what you like, or whatever you find easiest. It's just for funsies.
When I was done quilting it, I zig zagged the outer edges and trimmed, so that I had a nice neat edge. If you have a serger, or overlock, do that to the edges. I don't, but that's okay, I think a zig zag trimmed nicely looks super great.
Then...here's where there might be a better way, but I think the way I did it works just fine. Take your quilted piece and sew the edges together (like the ends of your hotdog bun). Then take your circular piece and pin it to your tube.
So, sewing the circular bottom on. You might ask 'isn't it hard to sew a circle on the bottom?'. I don't think it is. That is, I don't think it is if you use enough pins. I use like 50 pins per bottom. If I could find more pins, I'd probably use more. I just start at one end and pin, then slowly work my way around pinning as I go. It makes it really easy. I don't have a picture of it though, so check out these websites for help: Round Bottom Bags at With Needle and Palm, Cotton and Cloud Circular Bottom Bags.
For the little cardboard insert, just lay the fabric circle printed side down, and place the cardboard circle on top. Dab a bit of glue on the top part and fold over the fabric to it. Do the opposite end, then the all the sides. Just glue 'er down. You're just covering the cardboard, so if it's not perfect, don't worry. You can even use the cardboard insert without covering it.
Then I added a grommet, because I love grommets. Just one, I was going to put a fabric loop through it, so I could hang it, but I haven't done that yet. Plus, I don't have any hooks to hang it on!
Also, circles are fun, but what if you want different sized buckets? WELL!! Math to the rescue, HERE is an amazing tool, it's a circumference calculator!!! I use this baby all the time.


1 comment:
These are gorgeous Sarah!
Post a Comment